In this post I am going to demonstrate how to configure Link Aggregation (LAGG) on TrueNAS 12 using a Cisco switch with VLANs. Aggregation is a method to bond multiple NICS together for additional bandwidth and redundancy.
Over the years TrueNAS has supported multiple protocols for LAGG but this post will be focusing on LACP. Link Aggregate Control Protocol is a negotiated protocol that works by exchanging frames with the peer to automatically bundle multiple links together.
While this post focuses on the use of Cisco switch, any managed switch that supports IEEE 802.3ad will work. If it does not support LACP then you may be limited to other protocols such has round robin or load balancing.
My Cisco switch can support up to 8 ports functioning in an aggregate group. However, I only have two ethernet ports on my server. I will be configuring TrueNAS through the console. I find it to be a little more straight forward than the GUI web interface.
To begin setting up LAGG in the console choose option #2:
Console setup
-------------

1) Configure Network Interfaces
2) Configure Link Aggregation
3) Configure VLAN Interface
4) Configure Default Route
5) Configure Static Routes
6) Configure DNS
7) Reset Root Password
8) Reset Configuration to Defaults
9) Shell
10) Reboot
11) Shutdown

You may try accessing the following URLs to access the web user interface:

https://192.168.1.15
Enter an option from 1-11: 2
Then select option “1” to Create Link Aggregation
1) Create Link Aggregation
2) Delete Link Aggregation
Enter an option from 1-2 (enter q to quit): 1
Select option “2” for LACP
1) failover
2) lacp
3) loadbalance
4) roundrobin
5) none
Select a lagg protocol (q to quit): 2
Now we need to add the interfaces we want to join to the Aggregate Group. My Dell server has two NICS. I select option “1”
1) bce0
2) bce1
Select an interface (q to quit): 1
I still have one more NIC to add. I select option “1” again. Take note that bce0 is no longer available as it has been already added to the aggregate group.
1) bce1
Select an interface (q to quit): 1
Now that your NICS have been added to LAGG, you may need to reconfigure your network interface again to reconfigure your IP, netmask, and gateway. However, until your switch is configured to use LACP the rest of your network will not be able to communicate with your FreeNAS box.
We will now set up your Cisco switch to talk to your FreeNAS box using LACP. There are several different ways to gain access to your Cisco console, serial cable, telnet, and ssh. I am using an ssh connection. If you haven’t had the opportunity to configure ssh check out a blog I published detailing the process. The tools that I am using for this are:
Cisco Switch Configuration
Here I will go over configuring the IOS on a Cisco switch to support the LACP connection you just created on your FreeNAS box.
Before you begin configuring your switch, please make sure all the interfaces that are connected to your NAS are enabled and linked at the same speed. If your ports are not all configured exactly the same we will not be able to bond the connections together to our LAGG.
So the first thing I am going to do is open up an SSH connection using KiTTY. Another great option is PuTTY. Either is great choice if you are doing this from Windows.
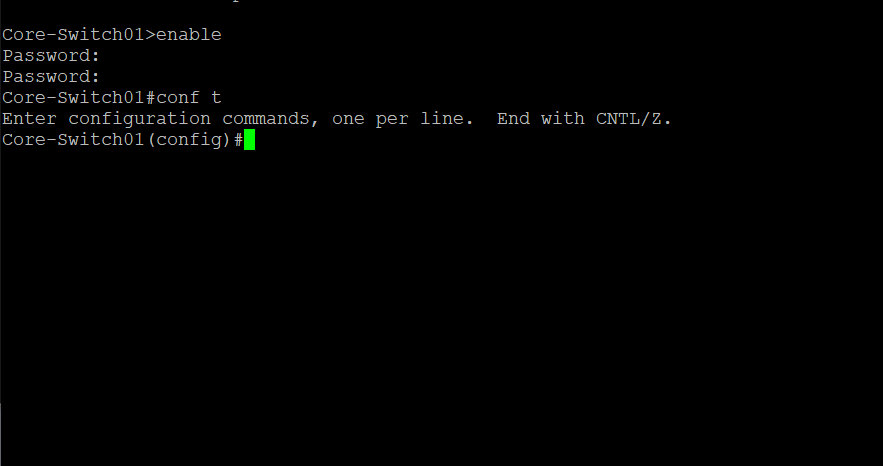
Once I connect to my switch, my next step will be to elevate my privilege level to make the necessary changes.
Type “enable” to enter Privileged EXEC mode
Type “conf t” to enter Global Configuration mode
Now I need to pick what interfaces that I am going to use. Normally I would just connect the Ethernet cables to the switch and configure the corresponding interfaces. However for instruction purposes I will show more of my work.
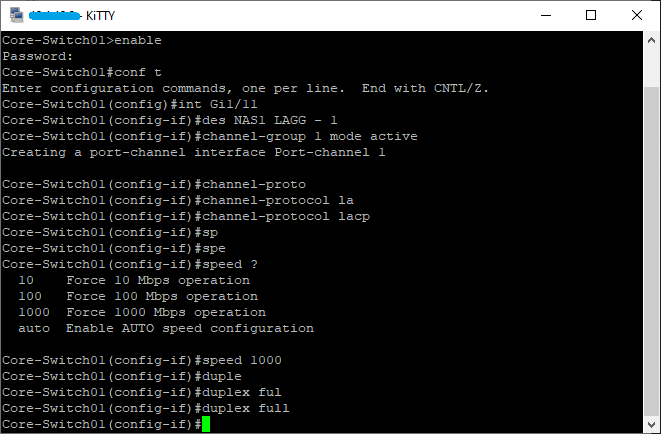
I am going to configure Gi1/11 and Gi1/12. I will be changing duplex from auto to full and speed to 1,000. I will basically be using interfaces 15 and 16 as the example in which I will be using to configure interfaces 11 and 12.
I will now configure Gi1/11.
Core-Switch01>enable
Password:
Core-Switch01#conf t
Core-Switch01(config)#int Gi1/11
Core-Switch01(config-if)#des NAS1 LAGG - 1
Core-Switch01(config-if)#channel-group 1 mode active
Core-Switch01(config-if)#channel-protocol lacp
Core-Switch01(config-if)#speed 1000
Core-Switch01(config-if)#duplex full
Here is a screenshot of the configuration process on interface Gi1/11
Interface Gi1/12 Configuration
Core-Switch01(config)#int Gi1/12
Core-Switch01(config-if)#des NAS1 LAGG - 2
Core-Switch01(config-if)#channel-group 1 mode active
Core-Switch01(config-if)#channel-protocol lacp
Core-Switch01(config-if)#speed 1000
Core-Switch01(config-if)#duplex full
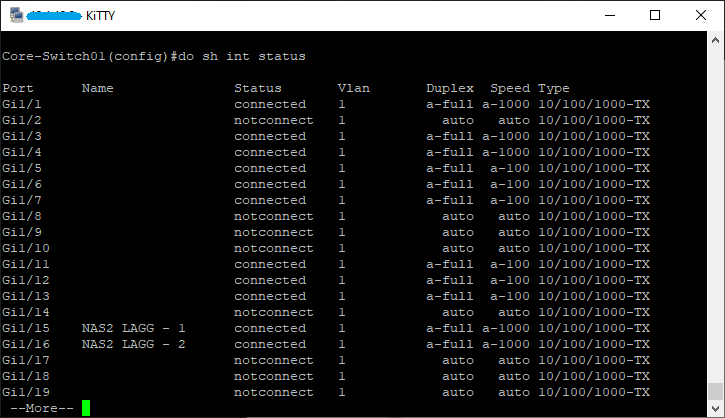
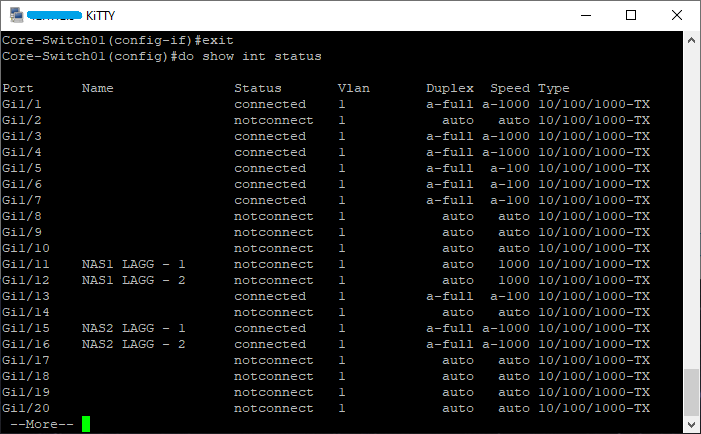
Now I check the interface status to verify that my changes were made.
Continue to repeat the configuration process for the interfaces until all your desired interfaces have been configured for LACP. The next step in the process is to create a Port Channel Interface.
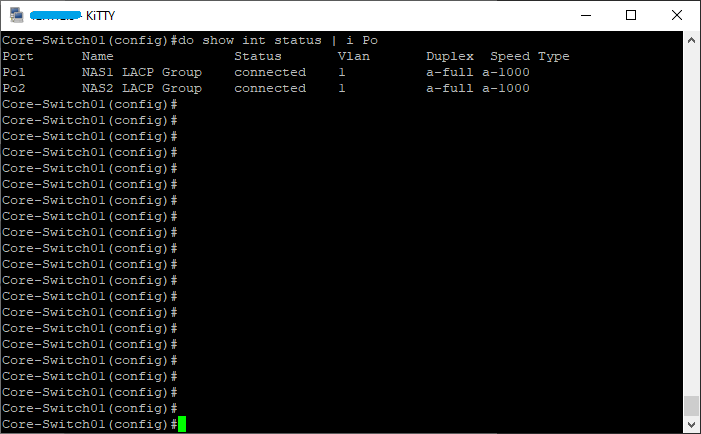
Now would be a great time to check the status of your port channel. Use this command:
Core-Switch01#show int status | i Po
Now it is important that you copy your running config to your startup config. Another thing that you may have noticed was that I was running several NAS boxes both configured for LACP. When adding a second LAGG, use channel-group 2 for the network interfaces and port-channel 2 when configuring the Port Channel Interface, and so forth. Each group will use its own individual corresponding number.